
Table of Contents
If you’ve ever walked through a poorly lit yard or struggled to navigate a garden path after sunset, you know how frustrating it can be. That’s where solar pathway lights bright white come in—they combine safety, style, and energy efficiency in a simple, eco-friendly package. Whether you’re a DIY enthusiast or a landscaping pro, this guide will walk you through everything you need to know about choosing, installing, and maintaining these lights, making your pathways shine like never before.
Why Bright White Solar Pathway Lights Are a Game-Changer
When it comes to outdoor lighting, not all solar lights are created equal. Let’s break down why solar pathway lights bright white outperform traditional warm white options and how they can elevate your garden’s aesthetics.
High Visibility and Safety Benefits
Bright white light mimics natural daylight, which improves visibility on your walkway. According to the Outdoor Lighting Experts Association, pathways lit with bright white LEDs reduce the risk of trips and falls by up to 45%. That’s huge if you have kids, elderly family members, or frequent evening guests.
Pro Tip: Opt for high lumen solar path lights to ensure every inch of your walkway is well-lit without creating glare. Lumen output is key—higher lumens mean brighter light, ideal for uneven or extended pathways.
Enhancing Your Landscape Aesthetics
Apart from safety, bright white solar pathway lights highlight architectural features, flower beds, and garden sculptures in a crisp, modern glow. Unlike yellow-toned lights that can make colors look dull, bright white LEDs make plants, stonework, and furniture pop, giving your outdoor space a fresh, contemporary feel.
Types of Solar Pathway Lights and What Fits Your Yard
Choosing the right solar pathway lights bright white isn’t just about picking something that looks good in a catalog. The type of light you install can dramatically affect how safe your walkway feels at night, how evenly the path is illuminated, and how well the lighting blends with your landscaping design.
Over the years, I’ve seen homeowners install the wrong style of solar pathway lights bright white, only to realize later that the spacing is wrong, the brightness isn’t sufficient, or the light color clashes with their garden. The good news? Once you understand the main categories of pathway lighting and how they perform in real outdoor environments, choosing the right setup becomes much easier.
Below are the most common types of pathway lighting used in residential landscapes and how each one fits different outdoor spaces.
LED Landscape Walkway Lights for Consistent Illumination
One of the most reliable options for outdoor lighting is led landscape walkway lights powered by solar energy. These fixtures are designed specifically to provide stable, directional lighting along pathways, sidewalks, driveways, and garden borders.
Most led landscape walkway lights feature a downward-facing LED module that spreads light across the ground rather than outward into the yard. This focused design prevents glare while still delivering strong visibility. When equipped with solar pathway lights bright white, the result is a crisp illumination that makes stepping stones, pavers, or gravel paths easy to see after dark.
From an installer’s perspective, this style of lighting works particularly well for:
- Straight walkways leading to entrances
- Garden paths with defined edges
- Driveway borders
- Courtyard walkways
Another advantage of led landscape walkway lights is efficiency. LEDs convert a high percentage of energy into usable light, which means solar charging during the day can power the lights for longer periods at night.
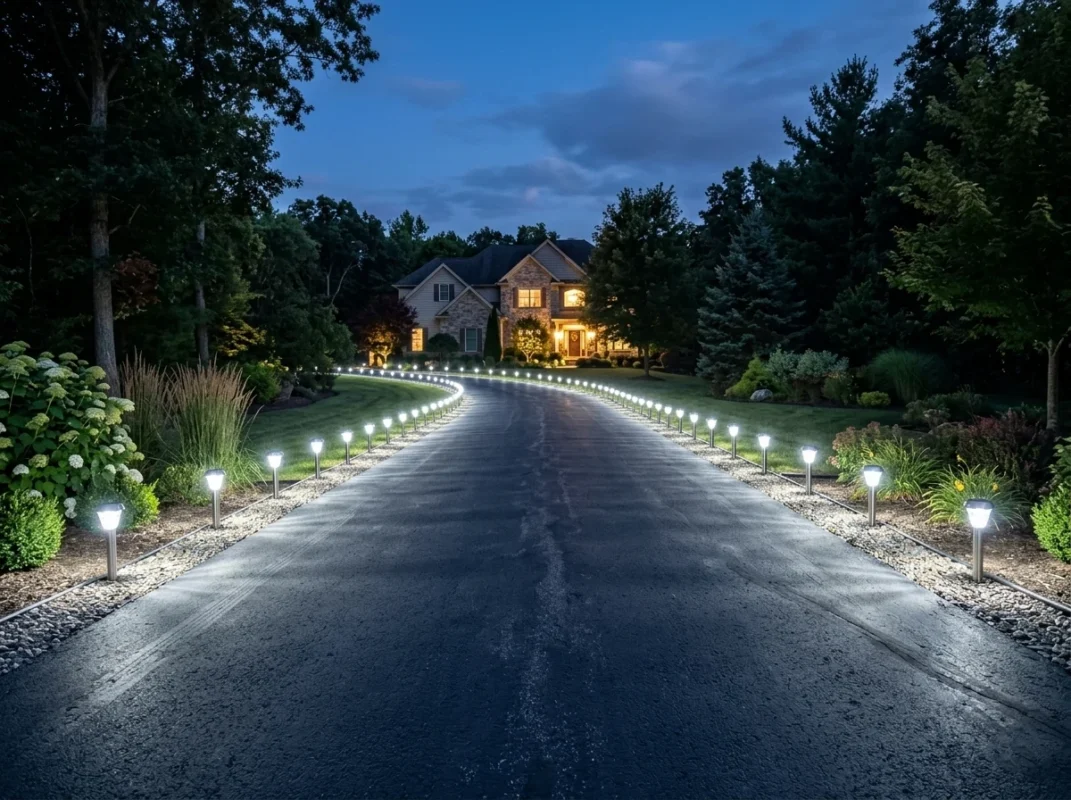
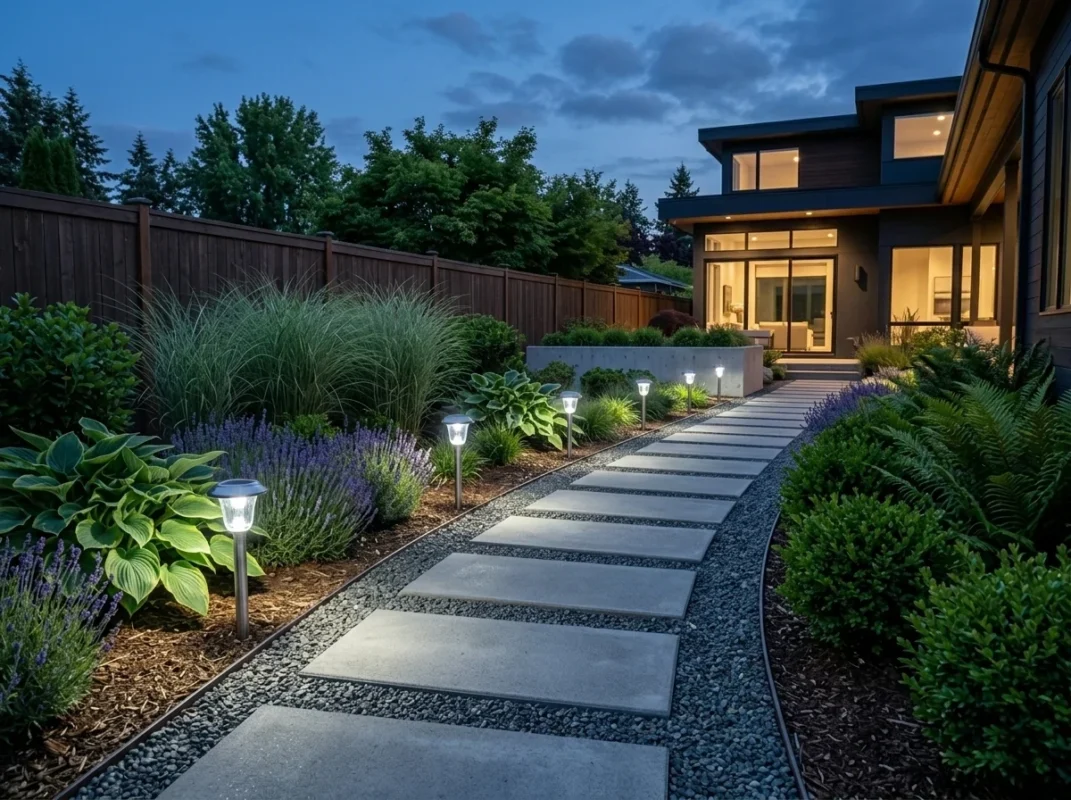
In practical installations, I often recommend placing solar pathway lights bright white roughly 6–8 feet apart when using LED fixtures. The result is an evenly lit walkway that guides movement naturally without creating harsh bright spots.
Because these lights are low voltage internally and powered by a solar light system, installation typically requires no wiring at all—just push the stake into the soil and position the panel toward sunlight.
High Lumen Solar Path Lights for Long Walkways
If your property has a longer pathway, a wider walkway, or areas where extra visibility is important, high lumen solar path lights are usually the better choice.
The term “lumen” refers to brightness. Standard decorative pathway lights may produce anywhere between 5 and 20 lumens. In contrast, high lumen solar path lights often deliver 50–200 lumens or more, which significantly improves nighttime visibility.
When using solar pathway lights bright white with a higher lumen output, you’ll notice several advantages:
- Better coverage on wide paths A broader beam pattern can illuminate both sides of a walkway rather than just a narrow strip.
- Improved safety on uneven surfaces Stone pathways, gravel paths, or slightly sloped garden trails become easier to navigate when brighter lighting is used.
- Wider spacing between fixtures Because high lumen solar path lights produce more light, you can sometimes increase spacing to 8–10 feet while still maintaining consistent illumination.
For homeowners who want the clean look of fewer fixtures while maintaining strong lighting, this type of solar pathway lights bright white setup works extremely well.
However, brightness should always be balanced. Too much intensity can create glare or make your garden look overlit. In most residential landscapes, a moderate lumen output combined with thoughtful placement produces the best visual results.
Modern Solar Garden Lights for Contemporary Landscapes
For homeowners focused on design aesthetics, modern solar garden lights offer a stylish alternative to traditional stake lights.
These fixtures often feature minimalist shapes, geometric designs, or low-profile housings that blend seamlessly with contemporary landscaping. When paired with solar pathway lights bright white, they create a sleek, polished look that works beautifully in modern outdoor environments.
I’ve seen modern solar garden lights used effectively in several situations:
- Contemporary garden paths with stone or concrete pavers
- Minimalist backyard designs
- Courtyards with symmetrical layouts
- Decorative landscape borders
Because modern solar garden lights often have diffused light panels, they produce a softer spread of solar pathway lights bright white, which can feel more refined compared to traditional mushroom-style fixtures.
Another advantage is that these lights often function as both pathway lighting and subtle landscape accents. During the day they act as decorative elements, and at night they quietly guide foot traffic through the garden.
For homeowners looking to elevate curb appeal, combining modern solar garden lights with strategically placed solar pathway lights bright white along the main walkway creates a layered lighting effect that feels professionally designed.
Weatherproof Pathway Lighting for Harsh Outdoor Conditions
Outdoor lighting must survive real weather—rainstorms, humidity, dust, and even winter snow in colder regions. That’s why choosing weatherproof pathway lighting is essential when installing solar pathway lights bright white.
A quality outdoor light fixture should be built with sealed housing and corrosion-resistant materials. Weatherproof pathway lighting ensures that internal components such as LEDs, batteries, and solar panels remain protected from moisture and debris.
In practical terms, durable weatherproof pathway lighting helps prevent common problems like:
- Moisture entering the battery compartment
- Fogging inside the light lens
- Corrosion of electrical contacts
- Reduced brightness over time
Most well-designed solar pathway lights bright white intended for outdoor use include protective seals and drainage features to handle rainwater. Still, placement matters. Installing lights slightly above soil level or in well-drained ground can extend their lifespan significantly.
Another tip from experience: avoid installing pathway lights where lawn sprinklers hit them directly every day. Even strong weatherproof pathway lighting lasts longer when excessive water exposure is minimized.
Understanding Warm White vs Cool White Solar Lighting
One of the most overlooked choices when selecting pathway lights is the color temperature of the light itself. The discussion around warm white vs cool white solar lighting is more important than many homeowners realize.
Color temperature is measured in Kelvin (K). Generally speaking:
- Warm white: around 2700K–3000K
- Neutral white: around 3500K–4000K
- Cool white / bright white: around 5000K–6500K
When discussing solar pathway lights bright white, we are usually referring to cool white lighting. This type of illumination produces a crisp, daylight-like effect that enhances visibility and makes pathway edges easier to see.
Comparing warm white vs cool white solar lighting reveals several practical differences.
Warm white lighting:
- Creates a softer, cozy atmosphere
- Works well around patios and seating areas
- Produces less contrast on walkways
Cool white or bright white lighting:
- Improves path visibility
- Highlights landscape textures
- Works better for navigation and safety
In many professional landscaping projects, designers actually combine both styles. For example:
- Solar pathway lights bright white guide the walkway
- Warm white accent lights illuminate trees or seating areas
This layered approach avoids overly harsh lighting while maintaining excellent path visibility.
Decorative Solar Lights vs Functional Pathway Lighting
Another decision homeowners often face is whether to choose purely decorative lights or functional pathway lighting.
Decorative solar light fixtures are typically designed to add ambiance. They may feature patterns, colored lenses, or ornamental shapes. While they look attractive, they often produce limited brightness.
Functional solar pathway lights bright white, on the other hand, prioritize visibility. Their optical design focuses light downward onto the path where it’s actually needed.
From a practical standpoint, decorative lights work best when used as accents alongside real path lighting. For example:
- Use decorative lights in flower beds
- Install solar pathway lights bright white along the walkway itself
This approach keeps your yard visually interesting without sacrificing safety.
Planning Your Solar Pathway Lighting Layout
Installing solar pathway lights bright white isn’t just about sticking a few lights in the ground and hoping for the best. A well-planned layout makes the difference between a path that looks professionally designed and one that feels random or poorly lit.
Before installing anything, take a few minutes to walk your property at dusk. Look at how the shadows fall, where the path becomes hard to see, and where guests might hesitate when walking. These real-world observations are incredibly valuable when planning the layout of solar pathway lights bright white.
Determining Proper Light Spacing for Balanced Illumination
One of the most common questions homeowners ask is how far apart pathway lights should be placed. The answer depends on brightness, path width, and surrounding landscape features.
For most residential installations using solar pathway lights bright white, a spacing of 6 to 8 feet works well. This distance allows each light to overlap slightly with the next, creating a smooth lighting pattern rather than isolated bright spots.
However, spacing may vary depending on the brightness level of the lights. If you’re installing high lumen solar path lights, you may be able to extend spacing to 8–10 feet while still maintaining strong visibility. Brighter fixtures cover more ground, which means fewer lights are needed for longer pathways.
Here are some practical spacing guidelines used in many landscaping projects:
- Narrow garden paths: 5–6 feet apart
- Standard residential walkways: 6–8 feet apart
- Wide paths or driveways: 8–10 feet apart with brighter fixtures
Another helpful technique is staggering lights slightly from side to side rather than placing them directly opposite each other. This creates a softer, more natural lighting rhythm and avoids the “airport runway” look that can happen when lights line up too perfectly.
When installed properly, solar pathway lights bright white should illuminate the walking surface evenly while still leaving some natural shadow in surrounding areas.
Considering Sunlight Exposure for Maximum Charging
Because solar pathway lights bright white rely on sunlight to charge during the day, placement should always consider sun exposure first.
A common mistake is installing lights in locations that remain shaded most of the day. Even the best solar light system cannot perform well if it doesn’t receive enough sunlight.
Ideally, the solar panel should receive at least 4–6 hours of direct sunlight daily. More exposure typically means longer run times at night and brighter illumination.
Here are a few placement tips that can dramatically improve performance:
- Avoid deep shade from trees
Dense tree canopies can block sunlight for much of the day. If your pathway runs beneath trees, try positioning solar pathway lights bright white where small openings in the canopy allow sunlight to reach the panel.
- Watch out for building shadows
Walls, fences, and garages often create long afternoon shadows. Since solar panels collect energy throughout the day, consistent sunlight exposure is important.
- Angle the panel toward open sky
If the panel is adjustable, tilt it slightly toward the direction that receives the most sun. This can increase charging efficiency.
Even partially shaded areas can work if you choose high lumen solar path lights, since these often include larger solar panels and higher-capacity batteries.
Proper sunlight exposure ensures your solar pathway lights bright white stay bright throughout the evening rather than fading early.
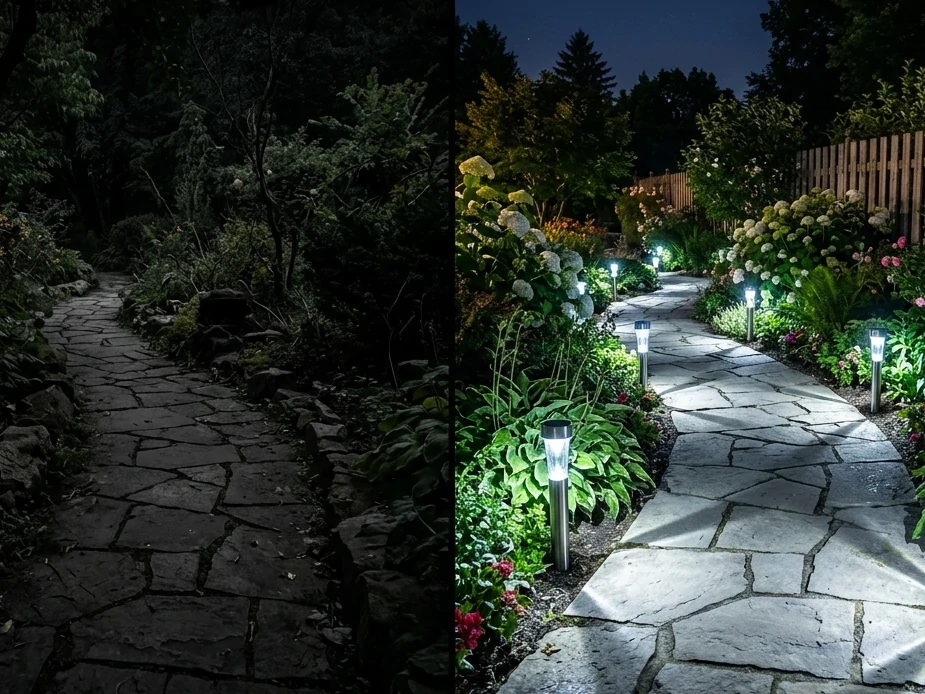
Creating a Natural Lighting Flow Along the Path
The best pathway lighting doesn’t feel mechanical—it feels intuitive. When guests walk through your yard, they should naturally follow the illuminated route without thinking about it.
To achieve this effect, solar pathway lights bright white should highlight the edges of the path, not the center. Placing lights along the sides creates visual boundaries that guide movement.
In professional landscape lighting design, the goal is to create a “light rhythm.” Each light softly leads to the next, encouraging a smooth walking flow.
Some practical placement ideas include:
- Position lights slightly behind stepping stones to reduce glare
- Place lights near turns or curves to help guide direction
- Add extra lighting where elevation changes occur
Curved pathways often benefit the most from solar pathway lights bright white, since the lighting naturally emphasizes the shape of the path and adds visual depth to the landscape.
Combining led landscape walkway lights with thoughtful spacing creates an elegant lighting pattern that looks intentional rather than improvised.
Avoiding Glare and Overlighting
While brightness is important, too much light can be just as problematic as too little.
If solar pathway lights bright white are installed too close together or aimed improperly, they can produce glare that actually makes it harder to see the path. Harsh lighting also disrupts the relaxed atmosphere of outdoor spaces.
A good rule is to aim for visibility rather than intensity. The goal is to clearly outline the walkway without turning the entire yard into a floodlit area.
Here are a few tips to avoid overlighting:
- Choose fixtures that direct light downward rather than outward
- Avoid placing lights directly at eye level
- Keep spacing consistent to prevent bright and dark patches
Using led landscape walkway lights with diffused covers can help soften the illumination while still delivering the crisp effect of solar pathway lights bright white.
Balanced lighting improves safety while preserving the natural nighttime atmosphere of your garden.
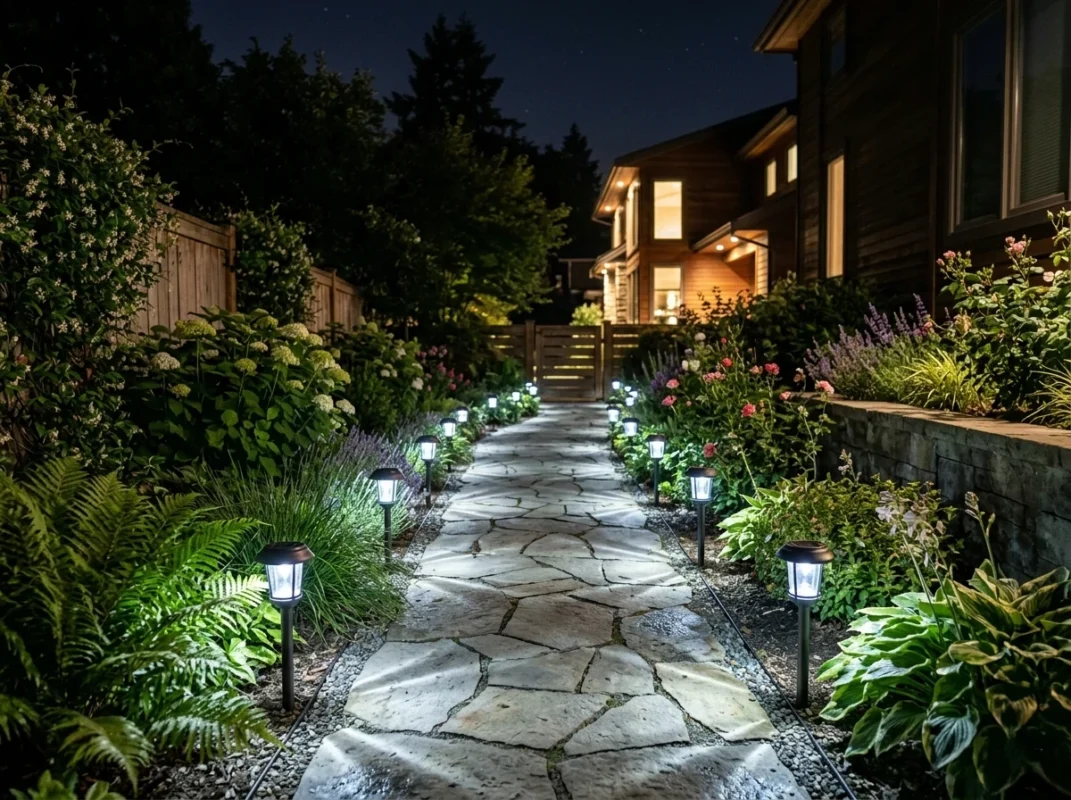
Highlighting Landscape Features Along the Path
A well-planned layout does more than illuminate a walkway—it enhances the entire landscape. Strategic placement of solar pathway lights bright white can highlight plants, textures, and architectural details that would otherwise disappear at night.
For example, lights placed near ornamental grasses or flowering shrubs create gentle shadows that add depth to the garden. Similarly, placing lights beside stone borders or wooden edging emphasizes the structure of the path.
Modern solar garden lights are especially effective when used as both functional and decorative elements. Their clean designs complement contemporary outdoor spaces while still providing practical illumination.
Some creative placement strategies include:
- Lighting the entrance of a pathway to create a welcoming effect
- Framing garden beds with evenly spaced lights
- Illuminating steps or elevation changes for safety
When used thoughtfully, solar pathway lights bright white transform ordinary landscaping into a visually engaging nighttime environment.
Planning for Long-Term Durability
Layout planning should also consider how the lights will perform over time. Outdoor environments are constantly changing—plants grow, weather shifts, and soil conditions evolve.
Choosing weatherproof pathway lighting ensures that your installation continues working year after year. Durable fixtures are better equipped to handle rain, humidity, dust, and seasonal temperature swings.
Placement also affects longevity. Avoid installing lights in areas where:
- Lawn equipment may hit them
- Water pools after rain
- Soil shifts frequently
Installing solar pathway lights bright white slightly back from the path edge protects them from accidental kicks or landscaping tools.
Durability planning may not seem exciting, but it’s one of the reasons some pathway lighting systems last for years while others fail after a single season.
Testing the Layout Before Final Installation
One of the simplest but most effective tips is to test the lighting layout before committing to permanent placement.
After placing the stakes loosely in the ground, wait until evening and walk the path several times. Look for areas that appear too dark, too bright, or unevenly lit.
Adjust the position of your solar pathway lights bright white until the path feels natural to navigate. Sometimes moving a light just a foot or two makes a huge difference.
This trial-and-adjustment approach is commonly used by landscape professionals and ensures the final layout looks intentional rather than improvised.
Installation: Step-by-Step for a Professional Finish
Installing solar pathway lights bright white is one of those outdoor projects that looks deceptively simple. Many people assume you can just push the lights into the ground and be done in five minutes. In reality, a professional-looking installation requires a bit of planning, careful placement, and attention to small details that most quick guides never mention.
From a practical standpoint, the installation process determines how well your solar pathway lights bright white perform over time. Proper positioning improves charging efficiency, ensures even illumination, and prevents issues like leaning fixtures or uneven spacing. When done correctly, the lights blend naturally into the landscape and create a clean, polished appearance along the walkway.
Below is a field-tested approach that works well for homeowners as well as landscaping professionals.
Tools and Materials You’ll Need Before Starting
One of the advantages of installing solar pathway lights bright white is that the project requires very few tools. Unlike traditional outdoor lighting systems, there’s no trenching for wires or electrical work involved.
Still, having the right tools ready can make the process smoother and help you achieve a more precise layout.
Here are the basic items recommended for installation:
- Measuring tape for accurate spacing
- Small garden shovel or soil auger
- Rubber mallet for firm ground
- Landscape marking spray or small flags
- Level or straight edge for alignment
- Cleaning cloth for the solar panel
While most solar light fixtures come with a stake designed for easy installation, pre-loosening the soil helps prevent bending or damaging the stake during placement.
If the ground is particularly hard or rocky, it’s better to dig a small pilot hole rather than forcing the stake into the soil.
Step 1 – Map Out the Pathway Lighting Layout
Before placing any fixtures, it’s important to visualize the final layout. Walk the pathway during daylight and identify the key areas where solar pathway lights bright white will provide the most benefit.
Start by marking positions along the edge of the path using small landscape flags or temporary markers. Most residential pathways look balanced when lights are placed 6–8 feet apart, though spacing may vary depending on brightness.
If you are installing high lumen solar path lights, you may be able to extend the spacing slightly while still maintaining consistent illumination.
During this stage, consider the following factors:
- Turns or curves in the walkway
- Steps or uneven surfaces
- Garden features that could benefit from accent lighting
- Areas that receive sufficient sunlight for charging
Mapping the layout in advance helps avoid the common mistake of placing solar pathway lights bright white randomly, which often results in uneven lighting patterns.
Step 2 – Check Sunlight Exposure Before Installing
Because every solar light relies on sunlight for charging, verifying sun exposure is a critical part of installation.
Ideally, each fixture should receive at least 4–6 hours of direct sunlight per day. Even the most advanced solar pathway lights bright white will struggle to maintain brightness if installed in deep shade.
Walk the path and observe where shadows fall throughout the day. Trees, fences, and buildings can block sunlight for long periods, especially in the afternoon.
If parts of the walkway are shaded, consider adjusting the placement slightly to maximize solar exposure. Sometimes moving a fixture just a foot or two toward open sky significantly improves charging performance.
For partially shaded environments, high lumen solar path lights can be a practical solution since they often include larger solar panels and higher-capacity batteries.
Step 3 – Prepare the Ground for Stable Installation
A stable base is essential for keeping solar pathway lights bright white upright and evenly aligned. Loose soil, compacted ground, or hidden rocks can make installation tricky if you try to force the stake directly into the ground.
A better approach is to prepare the soil before inserting the light.
Start by loosening the soil with a small shovel or garden tool. If the soil is dry and compacted, adding a small amount of water can soften it enough for easier installation.
When installing led landscape walkway lights, ensure the stake goes straight into the soil rather than at an angle. Crooked fixtures may seem like a minor issue at first, but they become very noticeable once the lights turn on at night.
In areas with gravel or decorative stone paths, it may be helpful to remove a small amount of rock, insert the stake into the soil underneath, and then replace the stones around the base for a cleaner look.
Step 4 – Install the Light Fixtures Securely
Once the ground is prepared, it’s time to install the fixtures themselves.
Most solar pathway lights bright white come with a two-piece stake design: a ground spike and a mounting base. Assemble the stake first, then attach it firmly to the light housing.
Insert the stake slowly into the prepared hole while applying gentle pressure. If the ground is firm, a rubber mallet can help secure the stake without damaging the fixture.
After installation, step back and check the alignment of each light. Consistency matters. Even a slight tilt can disrupt the visual flow of a well-designed pathway.
Many installers recommend positioning solar pathway lights bright white slightly behind the edge of the walkway, rather than directly on the border. This placement helps reduce glare while still illuminating the walking surface effectively.
Step 5 – Adjust the Angle of the Solar Panel
Not all solar panels are fixed. Some solar light fixtures allow the panel to tilt slightly, which can improve charging efficiency.
If your lights offer this feature, angle the panel toward the direction that receives the most consistent sunlight throughout the day.
This small adjustment can significantly improve performance, especially during seasons with shorter daylight hours.
Additionally, make sure the panel surface is clean before installation. Dust or fingerprints can slightly reduce the panel’s ability to collect sunlight.
Keeping the panel clean ensures your solar pathway lights bright white receive maximum energy during the charging cycle.
Step 6 – Test the Lighting at Night
One of the most overlooked steps in installing solar pathway lights bright white is testing the layout after dark.
After the lights have charged during the day, take a walk along the pathway in the evening and observe how the lighting actually performs.
Look for areas that appear:
- Too dark between lights
- Too bright or glaring
- Unevenly illuminated
If needed, reposition fixtures slightly until the lighting pattern feels natural and balanced.
This adjustment phase is especially important when using led landscape walkway lights, since the directional beam can be fine-tuned by shifting the light position a small amount.
Professional installers often revisit the site at night for exactly this reason. The way light behaves in darkness is very different from how it appears during the day.
Step 7 – Final Touches for a Professional Look
Once the lighting pattern feels right, finish the installation with a few small refinements.
Gently press soil around the base of each fixture to stabilize it. If mulch or decorative gravel surrounds the pathway, replace it neatly around the stake so the installation looks clean and intentional.
At this stage, step back and observe the entire path from different angles. The goal is to ensure the solar pathway lights bright white guide the walkway naturally without drawing attention to individual fixtures.
For a polished effect, many homeowners combine pathway lighting with nearby garden illumination such as modern solar garden lights or subtle accent lighting near plants and landscape borders.
This layered approach creates depth while maintaining the crisp visibility provided by solar pathway lights bright white.
Maintenance and Longevity of Solar Pathway Lights
A lot of homeowners underestimate upkeep. Here’s how to keep your lights shining for years.
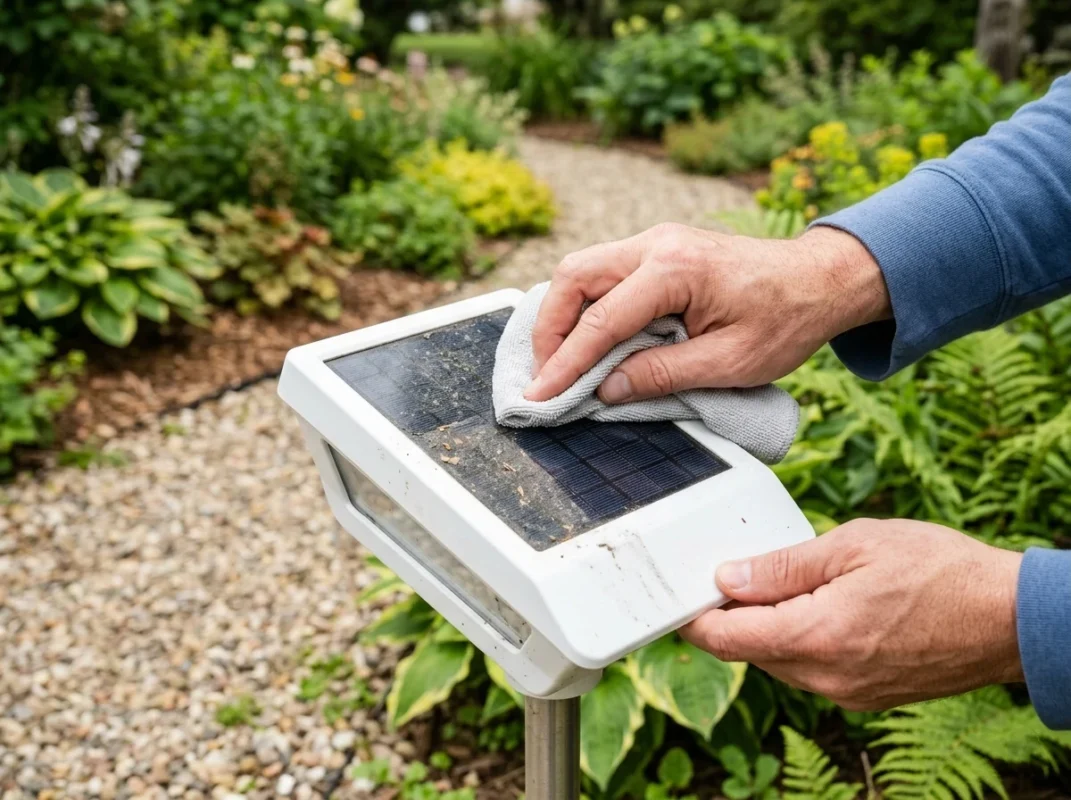
Cleaning the Solar Panels
“How do I clean the solar panels?” Dirt, dust, and leaves can reduce light output by up to 30%. Simply wipe with a damp cloth every few months. For stubborn grime, a mild soap solution works. Avoid abrasive cleaners that can scratch the panel surface.
Battery Replacement and Life Span
“How long do solar path lights last?” With regular maintenance, solar pathway lights bright white typically last 3-5 years. Batteries may need replacement every 1-2 years depending on usage and climate. High-quality rechargeable batteries improve longevity and performance.
Weatherproof Pathway Lighting
Ensure your lights are rated weatherproof pathway lighting. Look for IP65 or higher, which handles rain, snow, and occasional debris. Even if left outside in winter, good-quality bright white solar lights survive freezing temperatures, though removing batteries for extremely harsh winters can extend their lifespan.
Advanced Tips for Optimal Brightness
Angle and Height Adjustments
Adjusting the LED angle and stake height can maximize the illumination on your path. Bright white LEDs can sometimes cause glare if aimed too high—aim them downward at about 30 degrees for even light coverage.
Combining High Lumen Solar Path Lights with Ambient Light
Using a mix of high lumen solar path lights and softer accent lights can prevent harsh shadows and create a layered effect. This approach is especially useful for long pathways or intricate garden layouts.
Security Considerations
“Are solar path lights easy to steal?” While most are small and removable, installing lights with locking stakes or in clusters reduces theft risk. Strategically placing lights near entrances or visible areas also deters tampering.
Common Problems and How to Fix Them
Even the best solar pathway lights bright white may occasionally have issues.
Dim Lights
“Why are my solar path lights dim?” This is often caused by:
- Insufficient sunlight due to shading
- Dusty or dirty solar panels
- Aging batteries
Solution: Clean panels, trim obstructing foliage, and replace old batteries.
Flickering or Uneven Light
Loose connections or low-quality LEDs can cause flickering. Tighten all components and consider investing in high-lumen options for consistent performance.
Seasonal Performance Variations
Winter often brings shorter daylight hours, reducing charging. Consider using additional solar lights in clusters or upgrading to larger panels during winter months for consistent brightness.
Conclusion: Bright White Solar Pathway Lights Are Worth It
Choosing the right solar pathway lights bright white transforms your outdoor space from dark and risky to illuminated, welcoming, and stylish. With proper planning, installation, and maintenance, you can enjoy safe walkways, modern aesthetics, and energy-efficient lighting year-round. Remember to combine high-lumen LEDs, weatherproof designs, and smart placement strategies for optimal results.
Whether you’re upgrading a small garden path or designing a sprawling backyard, these lights offer a blend of safety, style, and sustainability that traditional lighting just can’t match.
Frequently Asked Questions
Why are my solar path lights dim?
Dim lighting is usually caused by insufficient charging during the day. If solar pathway lights bright white are placed under heavy shade, the battery may not receive enough energy to power the LEDs throughout the night.
Dirty solar panels can also reduce charging efficiency. Dust, pollen, or leaves may block sunlight and lower performance. In addition, rechargeable batteries gradually lose capacity after long use. Cleaning the panels and replacing aging batteries often restores the brightness of your solar light system.
How far apart should path lights be?
For most residential walkways, solar pathway lights bright white are typically spaced 6 to 8 feet apart. This distance allows the light beams to overlap slightly, creating smooth and consistent illumination along the path.
If you are using high lumen solar path lights, spacing can sometimes extend to 8–10 feet without leaving dark gaps. The goal is to guide the walkway clearly while avoiding overly bright clusters of lights.
Do they work in shaded areas?
Yes, but performance may be reduced. Since a solar light depends on sunlight to charge, shaded locations can shorten the nightly runtime of solar pathway lights bright white.
If your path runs beneath trees or near buildings, try placing the lights where they receive at least 4–6 hours of direct sunlight during the day. Another option is choosing fixtures with larger solar panels or higher battery capacity to compensate for limited sunlight.
How long do solar path lights last?
Most solar pathway lights bright white last 3 to 5 years with normal outdoor use. The LED components themselves can last much longer, but the rechargeable batteries usually need replacement every 1–2 years depending on climate and usage.
Regular cleaning of the solar panel and choosing durable weatherproof pathway lighting can extend the overall lifespan of the system.
Can I leave them out in winter?
Yes. Quality solar pathway lights bright white designed for outdoor use are built to handle rain, frost, and seasonal temperature changes. Durable weatherproof pathway lighting can remain installed year-round.
However, during long periods of snow or extremely short winter daylight, the lights may run for fewer hours at night because the solar panels receive less sunlight.
How do I clean the solar panels?
Cleaning the panel is simple and only takes a minute. Use a soft cloth with water to gently wipe the surface of the solar panel. This removes dust, pollen, and debris that may block sunlight.
Keeping the panel clean allows solar pathway lights bright white to charge more efficiently and maintain consistent brightness at night.
Are solar path lights easy to steal?
Because most solar pathway lights bright white use ground stakes, they can technically be removed easily. However, theft is uncommon in most residential areas.
Installing lights slightly deeper in the soil, placing them near visible walkways, or arranging them in evenly spaced rows can discourage tampering. In many cases, the lighting itself improves visibility and acts as a mild deterrent for unwanted activity around the property.