
Table of Contents
If you’re staring up at buzzing fluorescent tubes and wondering whether it’s finally time to upgrade, you’re not alone.
Switching to a 4 foot LED light fixture is one of the most practical lighting upgrades you can make — whether it’s your garage, office, retail space, or warehouse. But the real question isn’t just can you switch. It’s:
- Should you replace tubes or the entire fixture?
- Do you need to remove the ballast?
- Is this a DIY project?
- What actually happens if you install it wrong?
- And how much money are you really saving?
If you want to know exactly how to convert 4ft fluorescent light to LED, whether a 4 foot LED light fixture is worth it, and how to avoid costly mistakes, keep reading.
Why Upgrade to a 4 Foot LED Light Fixture? (Energy, Lifespan & Cost Breakdown)
If you’re still running fluorescent tubes, you’re not alone. Millions of garages, offices, schools, and warehouses across the U.S. still rely on them. But here’s the honest truth from the field: most property owners don’t upgrade until something starts flickering, buzzing, or failing.
Upgrading to a 4 foot LED light fixture isn’t about chasing trends. It’s about eliminating inefficiencies that quietly drain your budget year after year. When you break it down—energy use, lifespan, maintenance, and long-term cost—the numbers tell a clear story.
Let’s walk through it carefully.
Energy Savings Compared to Fluorescent Tubes
A typical 4-foot fluorescent tube draws 32–40 watts. Add ballast consumption (usually another 2–5 watts), and you’re closer to 40–45 watts per fixture in real-world conditions.
A modern 4 foot LED light fixture delivering equivalent brightness usually consumes between 15–20 watts.
That’s roughly 40–60% lower energy consumption per fixture.
Now multiply that across a real space:
- 100 fixtures
- 10 hours per day
- 5 days per week
- $0.12 per kWh
The annual savings quickly climb into the thousands.
According to data published by the U.S. Department of Energy, LED lighting systems can reduce lighting energy use by up to 75% compared to legacy fluorescent systems under certain conditions. While every facility is different, most commercial retrofits fall comfortably within the 40–60% savings range.
That’s not theoretical. That’s reflected in actual utility bills.
When upgrading to a 4 foot LED light fixture, you’re not just reducing wattage. You’re eliminating ballast losses, reducing heat output, and improving overall electrical efficiency.
Less heat also means less strain on HVAC systems—especially in warehouses and large retail environments.
Lifespan Comparison: Fluorescent vs 4FT LED
Here’s where the long-term economics really shift.
A standard fluorescent tube typically lasts:
- 7,000–15,000 hours
- Ballasts often fail sooner
- Performance drops sharply before failure
By contrast, a properly designed 4 foot LED light fixture is commonly rated between:
- 50,000–100,000 hours (L70 rating)
What does that mean in practical terms?
If lights operate 10 hours per day:
- Fluorescent may need replacement every 2–3 years
- A 4 foot LED light fixture may last 10–15 years
And LEDs don’t fail the same way fluorescents do. Fluorescent tubes flicker, hum, blacken at the ends, and sometimes refuse to start in cold weather. LEDs gradually dim over time, offering predictable performance.
For facilities with high ceilings, lift rentals, or labor-intensive maintenance, that lifespan difference alone justifies switching to 4 ft LED light fixtures.
One maintenance supervisor once explained it this way:
“Fluorescent keeps you busy. LED lets you forget about it.”
That’s operational efficiency.
Maintenance Reduction in Commercial & Industrial Settings
Maintenance costs are often underestimated when evaluating lighting upgrades.
With fluorescent systems, common issues include:
- Ballast failure
- Starter issues
- Socket wear
- Cold-start flickering
- Uneven light output
When you install a new 4 foot LED light fixture, you remove the ballast entirely. That eliminates one of the most failure-prone components in traditional fixtures.
Even when using retrofit tubes, choosing a ballast bypass configuration reduces long-term failure risk. That’s why many electricians recommend bypassing older ballasts when converting.
Over time, switching to 4 ft LED light fixtures simplifies inventory, reduces emergency service calls, and lowers labor hours spent on ladder work.
In large facilities, that translates into real operational savings—not just energy savings.
Environmental & Safety Advantages
Fluorescent tubes contain mercury. Break one, and you have a hazardous cleanup situation. Disposal regulations also apply, especially in commercial properties.
A 4 foot LED light fixture contains no mercury and produces significantly less heat.
Lower heat output means:
- Reduced fire risk
- Lower cooling demand
- Improved overall building efficiency
Additionally, LED lighting reaches full brightness instantly—even in cold environments—making it ideal for garages, storage units, and industrial settings.
From an environmental standpoint, the extended lifespan of a 4 foot LED light fixture also reduces landfill waste over time.
Replacing fluorescent tubes every few years versus installing a system that lasts a decade or more has measurable environmental impact.
Total Cost of Ownership: The Real Decision Factor
Many people focus on purchase price alone. That’s a mistake.
When evaluating a 4 foot LED light fixture, consider:
- Energy savings
- Reduced maintenance
- Elimination of ballast replacement
- Extended lifespan
- Reduced downtime
While the upfront cost of a 4 foot LED light fixture may be higher than buying replacement fluorescent tubes, the total cost of ownership is almost always lower within a 1–3 year window.
After that, every month becomes net savings.
This is why commercial properties, municipalities, and school districts have accelerated LED retrofits over the past decade.
It’s not about aesthetics.
It’s about efficiency, reliability, and predictable operating costs.
When Upgrading Makes the Most Sense
Upgrading to a 4 foot LED light fixture is especially worthwhile if:
- Your ballasts are over 5 years old
- You’re experiencing flickering or buzzing
- You operate lights more than 6 hours per day
- Maintenance requires lifts or specialized access
- Energy costs are rising in your region
In short: if your lighting runs daily and reliability matters, the upgrade usually pays for itself.
Types of 4 Ft LED Light Fixtures and Tubes
There’s more than one way to upgrade. The best choice depends on your building, budget, and comfort level with wiring.
Integrated 4 Foot LED Light Fixture (All-in-One)
This means removing the fluorescent fixture entirely and installing a new 4 foot LED light fixture.
Advantages:
- Clean wiring
- No ballast
- Modern driver technology
- Highest reliability
- Often better light distribution
This approach is common in warehouses, offices, schools, and retail environments where long-term performance matters more than minimal upfront cost.
If your fluorescent fixture housing is old or rusted, replacing it with a new 4 ft LED light fixture is often smarter than retrofitting.
4FT LED Bulbs (Tube Replacement Options)
If your existing housing is in good shape, a 4 foot fluorescent light LED replacement may be enough.
There are three main types of 4 foot LED bulbs:
Type A – Ballast Compatible
These plug directly into the existing ballast.
Pros:
- Quick install
- Minimal wiring changes
Cons:
- Ballast still consumes power
- Ballast failure still possible
If your ballast is aging, this is only a short-term fix.
Type B – Ballast Bypass
These require rewiring to remove or bypass the ballast.
Pros:
- Maximum efficiency
- No ballast failure
- Longer lifespan
Cons:
- Requires wiring knowledge
Many electricians prefer this method when performing a 4 foot fluorescent light LED replacement because it eliminates future ballast problems.
Type A+B Hybrid Tubes
These can work with or without a ballast.
They provide flexibility if you’re unsure about your system, but always verify compatibility before installation.
Choosing Between Fixture Replacement vs Tube Retrofit
If you’re asking how to change fluorescent to LED, start here:
- If the fixture housing is damaged → install a new 4 foot LED light fixture
- If housing is solid → consider 4ft LED bulbs
- If doing large-scale upgrades → new 4 ft LED light fixtures often provide cleaner long-term ROI
Professionals often recommend full 4 foot LED light fixture replacement in commercial settings because labor cost is the same whether you rewire old fixtures or install new ones.

How to Convert 4FT Fluorescent Light to LED (Step-by-Step Guide)
If you’re researching how to convert 4ft fluorescent light to LED, you’re probably in one of two situations:
- Your fluorescent tubes are flickering, humming, or failing.
- You’re ready to cut energy costs and modernize your lighting.
The good news? Converting to a 4 foot LED light fixture or installing 4ft LED bulbs is one of the most practical electrical upgrades a homeowner or facility manager can make.
The key is doing it correctly.
Below is the real-world, electrician-informed process for safely converting a 4-foot fluorescent system — whether you’re doing a simple 4 foot fluorescent light LED replacement or installing a brand-new 4 ft LED light fixture.
Step 1 – Identify Your Existing Fixture Type
Before touching a wire, identify exactly what you’re working with.
Open the fixture and check:
- Tube type (T8 or T12)
- Ballast type (magnetic or electronic)
- Socket configuration (bi-pin, single-pin, shunted/non-shunted)
Older T12 systems almost always use magnetic ballasts. These are inefficient and typically good candidates for full removal.
Newer T8 fixtures may use electronic ballasts, which could support certain 4 foot LED bulbs — but compatibility must be verified.
Why this matters:
If you install the wrong type of LED tube without understanding the ballast configuration, you can cause flickering, driver damage, or complete failure.
This first inspection determines whether you:
- Install ballast-compatible 4ft LED bulbs
- Perform a ballast bypass
- Replace the entire unit with a new 4 foot LED light fixture
Take your time here. Five extra minutes of inspection prevents expensive mistakes.
Step 2 – Decide: Ballast Compatible or Ballast Bypass?
This is the most important decision in the conversion process.
There are two primary methods when learning how to convert 4ft fluorescent light to LED:
Option A: Ballast-Compatible LED Tubes (Plug-and-Play)
These 4 foot LED bulbs operate using the existing ballast.
Advantages:
- Fast installation
- No rewiring required
- Ideal for quick retrofits
Disadvantages:
- Ballast continues consuming energy
- Ballast can still fail
- Slightly reduced overall efficiency
This option works best when:
- The ballast is relatively new
- You need minimal downtime
- You’re upgrading temporarily
Option B: Ballast Bypass (Direct Wire)
This method removes or bypasses the ballast entirely.
Most electricians recommend this approach for long-term reliability.
Advantages:
- Eliminates ballast failure risk
- Maximizes energy savings
- Simplifies future maintenance
- Extends lifespan of the LED driver
Disadvantages:
- Requires rewiring
- Must follow electrical safety standards
If your ballast is more than 5–7 years old, bypassing is usually the smarter move.
When converting multiple fixtures in commercial spaces, installing direct-wire 4ft LED bulbs or replacing with a new 4 foot LED light fixture typically delivers better ROI.
Step 3 – Turn Off Power (Non-Negotiable)
Before starting the physical conversion:
- Turn off the wall switch.
- Shut off the breaker at the panel.
- Confirm no voltage using a tester.
Even experienced electricians treat this step seriously. Fluorescent fixtures carry line voltage, and accidental contact can cause serious injury.
If you’re uncomfortable working inside electrical housings, this is where you call a licensed professional.
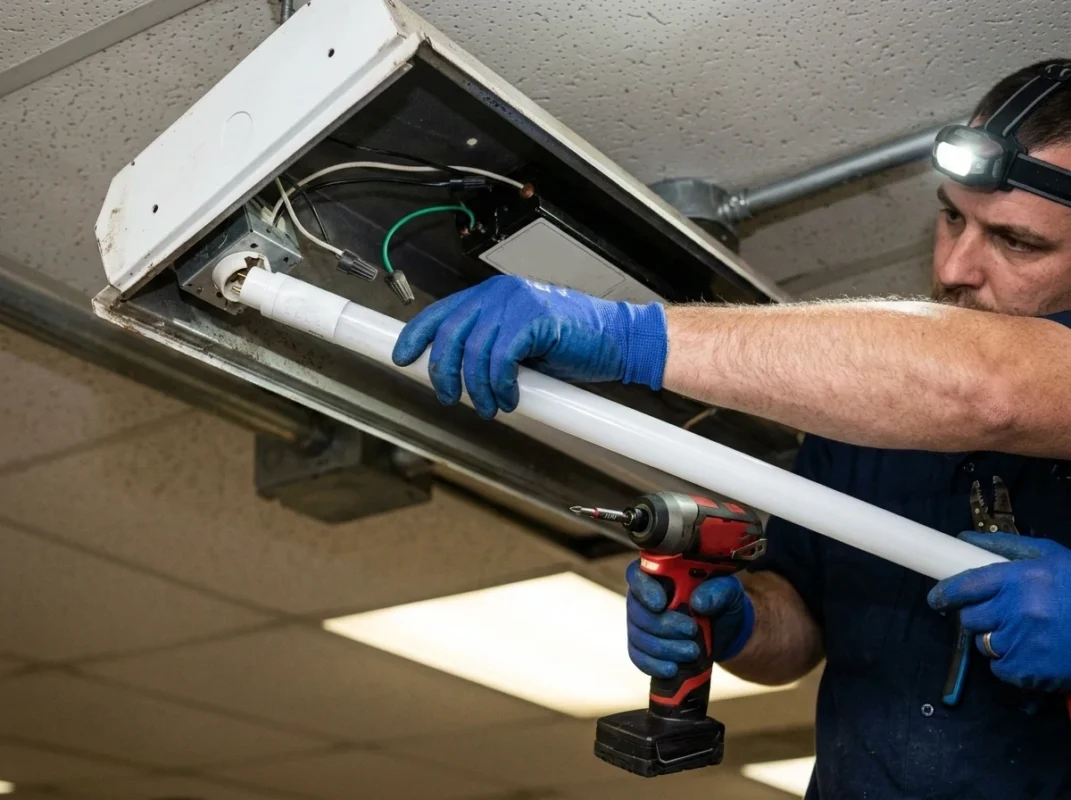
Step 4 – Remove Fluorescent Tubes and Ballast
If performing a ballast bypass:
- Remove the fluorescent tubes.
- Open the fixture cover.
- Locate the ballast (rectangular metal box).
- Disconnect and remove the ballast wiring.
At this stage, you are preparing the housing for a 4 foot fluorescent light LED replacement using direct-wire tubes.
Some installers choose to remove the ballast entirely. Others disconnect and cap it. Complete removal is cleaner and reduces clutter inside the housing.
If instead you are installing a brand-new 4 ft LED light fixture, this is where the old fixture is fully removed from the ceiling.
Step 5 – Rewire the Sockets (Ballast Bypass Method)
When learning how to change fluorescent to LED, this is the step that matters most.
Direct-wire LED tubes typically use one of two configurations:
- Single-end power (line and neutral on same end)
- Double-end power (line on one side, neutral on the other)
Carefully follow the wiring diagram included with your 4ft LED bulbs.
General process:
- Connect line (hot) to designated socket terminals
- Connect neutral to appropriate socket terminals
- Ensure non-shunted sockets if required
- Cap unused wires securely
Do not guess on wiring layout.
Improper wiring is the main reason people experience flickering or premature failure after attempting a 4 foot fluorescent light LED replacement.
Step 6 – Install the 4FT LED Bulbs
Once rewiring is complete:
- Insert the 4ft LED bulbs
- Ensure proper orientation (especially with single-end power tubes)
- Secure the fixture cover
- Restore power at breaker
- Test operation
If installing a full 4 foot LED light fixture, mount the new housing securely, connect line and neutral, ground properly, and secure all hardware before energizing.
Always confirm:
- No exposed wiring
- Ground connection is secure
- Fixture is mounted flush and stable
Step 7 – Label the Fixture (Professional Best Practice)
Electrical codes often require labeling fixtures that have undergone ballast bypass.
Why?
Because future maintenance technicians must know the fixture no longer operates with a ballast.
Add a label inside the housing stating:
“Ballast removed – Direct-wire LED only.”
This small step prevents someone from reinstalling fluorescent tubes later and causing damage.
Professionals never skip this.
Common Mistakes to Avoid When Converting
From years of field experience, here are the most common errors when converting to a 4 foot LED light fixture or LED tube system:
- Mixing incompatible tube types
- Leaving old ballast connected accidentally
- Using shunted sockets incorrectly
- Ignoring voltage ratings
- Failing to verify power is off
If you’re unsure at any stage, stop and consult a licensed electrician.
Converting lighting isn’t complicated, but it does require precision.
When It’s Better to Replace the Entire Fixture
Sometimes the smartest way to handle a conversion isn’t rewiring at all.
Replace the housing completely with a new 4 foot LED light fixture if:
- The metal housing is rusted
- Sockets are brittle or damaged
- Wiring insulation is deteriorated
- You want improved light distribution
- You’re upgrading an entire facility
In many commercial settings, installing new 4 ft LED light fixtures is more efficient than retrofitting aging fluorescent housings.
Labor time is similar, but long-term reliability improves significantly.
DIY vs Professional Installation: Be Honest About Skill Level
Home garage?
Small basement?
Single fixture replacement?
A confident DIYer can handle learning how to change fluorescent to LED.
Large warehouse?
Multiple circuits?
Complex wiring?
Hire a licensed electrician.
Professional installation ensures:
- Code compliance
- Proper grounding
- Safe connections
- Correct labeling
- Insurance protection
Lighting upgrades should save money—not create liability.
Expert Takeaway
Learning how to convert 4ft fluorescent light to LED isn’t complicated—but it must be done correctly.
Whether you:
- Install ballast-compatible 4ft LED bulbs
- Perform a direct-wire 4 foot fluorescent light LED replacement
- Replace the entire housing with a new 4 foot LED light fixture
The goal is the same:
- Improve efficiency
- Increase reliability
- Reduce maintenance
- Lower long-term operating costs
Done properly, the conversion pays for itself within a few years—and then continues saving you money for the next decade.
The key isn’t just swapping tubes.
It’s understanding the system—and upgrading it intelligently.
What Happens If You Put an LED Bulb in a Fluorescent Fixture?
This is one of the most common mistakes.
Scenario 1 – Using Ballast-Compatible LED Tube
If compatible, it works.
But you still consume ballast energy and risk premature failure.
Scenario 2 – Using Ballast Bypass LED Without Removing Ballast
It will not work — and may damage the tube.
If you attempt a 4 foot fluorescent light LED replacement without understanding tube type, you risk flicker, buzzing, or shorting the driver.
What Happens If You Put an LED Bulb on a Ballast?
If the tube is not rated for ballast operation:
- It may flicker
- It may not turn on
- It may fail prematurely
Always verify tube type before installing in a 4 foot LED light fixture conversion scenario.
Cost to Convert 4 Foot Fluorescent Light LED Replacement
Let’s talk money.
Cost of 4FT LED Bulbs
Typical range:
$8–$25 per tube depending on lumens and driver quality.
For a two-tube fixture:
$16–$50 total material.
Cost of 4 Ft LED Light Fixtures
A new 4 foot LED light fixture typically ranges:
$40–$120 depending on brightness and build quality.
For commercial installs, bulk pricing reduces cost significantly.
Installation Costs
DIY:
Minimal, aside from your time.
Electrician:
$50–$100 per fixture labor depending on complexity.
For large buildings, labor may be negotiated per fixture.
ROI & Payback Period Calculation
Example:
50 fixtures
Each saves 20 watts
Operating 10 hours daily
$0.12/kWh rate
Annual savings ≈ $438
Typical payback period:
1–3 years.
After that, your 4 foot LED light fixture savings compound annually.
What Are Two Disadvantages of LED Lights? (Balanced Expert Analysis)
No technology is perfect.
Higher Upfront Cost
A new 4 foot LED light fixture costs more initially than fluorescent tubes.
But long lifespan offsets this quickly.
Light Quality Concerns
Low-quality LEDs may:
- Have poor color rendering (CRI below 80)
- Produce harsh 5000K glare
- Flicker due to poor driver quality
Choose fixtures rated 80+ CRI for offices and retail.
Compatibility Issues
Improper 4 foot fluorescent light LED replacement can cause:
- Flicker
- Driver burnout
- Socket damage
This is why understanding how to convert 4ft fluorescent light to LED correctly matters.
How Long Do 4 Foot LED Lights Last?
A well-built 4 foot LED light fixture is rated 50,000–100,000 hours.
That’s:
- 13+ years at 10 hours daily
- 24/7 operation ≈ 5.7 years continuous
L70 rating means brightness reduces to 70% at end of life.
Unlike fluorescent, LEDs don’t suddenly fail — they gradually dim.
Factors That Affect Longevity
- Heat dissipation
- Driver quality
- Voltage stability
- Proper installation
A poorly ventilated 4 ft LED light fixture may fail early.
Professional vs DIY Installation – Which Is Right for You?
When DIY Makes Sense
- Garage conversions
- Basement workshops
- Small offices
If you’re comfortable following wiring diagrams, converting to a 4 foot LED light fixture is manageable.
When to Hire an Electrician
- Large commercial projects
- Code compliance concerns
- Complex multi-circuit wiring
Professionals ensure your 4 ft LED light fixtures meet electrical standards and labeling requirements.
Choosing the Best 4 Foot LED Light Fixture (Buying Guide)
After you’ve decided to upgrade your lighting system and understand how to convert 4ft fluorescent light to LED, the next critical step is choosing the right 4 foot LED light fixture for your specific needs.
Selecting a fixture isn’t just about price or watts. Done right, this decision affects:
- Light quality
- Energy bills
- Maintenance costs
- Long-term reliability
Below, we break down the most important criteria you should evaluate before investing — from brightness and color temperature to certifications and installation considerations. This is a practical, expert-level buying guide built on real-world experience.
Lumens vs Watts: Understanding What Really Matters
One of the most common mistakes people make is focusing on watts instead of lumens.
In fluorescent systems, watts loosely correlated with brightness. But with LED technology, a lower wattage can produce equal or greater light output with far better efficiency.
Here’s the simple rule:
- Watts measure energy consumed
- Lumens measure light produced
A typical 4 foot LED light fixture suitable for general-purpose lighting produces between 1,800–2,400 lumens. In contrast, a fluorescent tube may only deliver 1,200–1,600 lumens at higher wattage.
When comparing fixtures:
- Look first at lumens
- Then look at wattage
- Finally evaluate how efficiently the system converts electricity into usable light
This ensures you choose a 4 ft LED light fixture that delivers the brightness you need without wasting energy.
Color Temperature: Matching Light to the Space
LED lights come in a range of color temperatures, measured in Kelvins (K). The number doesn’t represent heat — it describes the visual temperature of the light.
Different spaces call for different environments:
- 3000K (Warm White): Relaxed and inviting — great for residential areas or customer-facing spaces.
- 4000K (Neutral White): Balanced and bright — ideal for offices, classrooms, and common areas.
- 5000K+ (Daylight): Crisp and vibrant — perfect for warehouses, garages, and inspection areas.
Choosing the correct color temperature is an often-overlooked part of selecting a 4 foot LED light fixture. The wrong choice can make a space feel harsh or washed out, even if the fixture is technically perfect.
For spaces where accuracy is important — like design studios or medical areas — aim for a neutral or daylight color range.
Color Rendering Index (CRI): How True Colors Appear
CRI measures how accurately a light source reveals the true colors of objects compared to natural daylight. Scores range from 0–100.
- 70–80 CRI: Acceptable for garages or basements
- 80+ CRI: Suitable for offices and retail
- 90+ CRI: Excellent color fidelity for design spaces and showrooms
Many fluorescent replacements have low CRI, which means colors look dull or distorted. A quality 4 foot LED light fixture rated 80+ CRI shows colors more naturally, reducing eye strain and improving visual clarity — especially in work environments.
Certifications: What to Look For
Certifications matter because they indicate that a 4 foot LED light fixture has been independently tested for safety, reliability, and performance.
The key certifications to watch for include:
- Safety Listing: Ensures the fixture meets basic electrical safety standards
- Performance Qualification: Confirms the light output and energy performance claims
- Environmental Compliance: Indicates that the fixture meets regulatory requirements for hazardous materials
Fixtures that meet recognized certification standards tend to last longer and require less maintenance — critical when you’re relying on them for daily operations.
Driver and Thermal Management: Behind the Scenes Durability
A common point that’s ignored until it’s too late is the LED driver — the component that regulates power to the light source.
A high-quality driver does two things:
- Maintains consistent light output
- Protects against power surges and heat degradation
Thermal management — how well a fixture dissipates heat — is equally important. Poor heat dissipation kills LEDs more quickly than any other factor.
When evaluating 4 foot LED light fixtures, look for:
- Designs that integrate heat sinks or thermal channels
- Ratings that include lumen maintenance over time
- Longer warranty periods linked to proven durability
If a fixture can’t handle heat effectively, you’ll notice:
- Early dimming
- Flickering
- Shortened life
Good fixtures manage heat so well that performance remains steady year after year.
Installation and Mounting Options
Once you’ve selected the right performance characteristics, consider how the fixture installs.
Questions to ask:
- Is it surface-mounted or suspended?
- Does it require new hardware or adapt to existing mounts?
- Is wiring straightforward for direct connection?
Some 4 foot LED light fixtures are designed for easy retrofit into fluorescent housings with minimal modification. Others are built as stand-alone units. Each approach has its place, depending on whether you’re upgrading one fixture or overhauling an entire space.
If you’re retrofitting existing fluorescent fixtures, ensure compatibility with your current ceiling architecture and electrical setup.
Warranty and Manufacturer Support
A solid warranty reflects confidence from the manufacturer in their product.
When a 4 foot LED light fixture comes with a longer warranty:
- You have protection against early failure
- You benefit from manufacturer support
- You’re more likely to receive timely assistance if issues arise
Warranty coverage can also indicate the quality of components inside the fixture — particularly drivers and LEDs themselves.
Remember: a longer warranty isn’t just paperwork. It’s a reflection of confidence in performance and durability.
Price vs Long-Term Value: Don’t Focus Only on Cost
It’s tempting to buy the cheapest 4 foot LED light fixture you can find. But lighting isn’t a disposable purchase. You want a solution that:
- Lasts longer
- Saves energy
- Reduces maintenance
- Improves working conditions
A fixture that costs slightly more upfront, but runs efficiently for 15,000 hours longer than a cheap alternative, almost always delivers better total value.
Think in terms of total cost of ownership, not just up-front price.
Matching Fixture to Application: Practical Examples
Here’s how lighting professionals make decisions in the field:
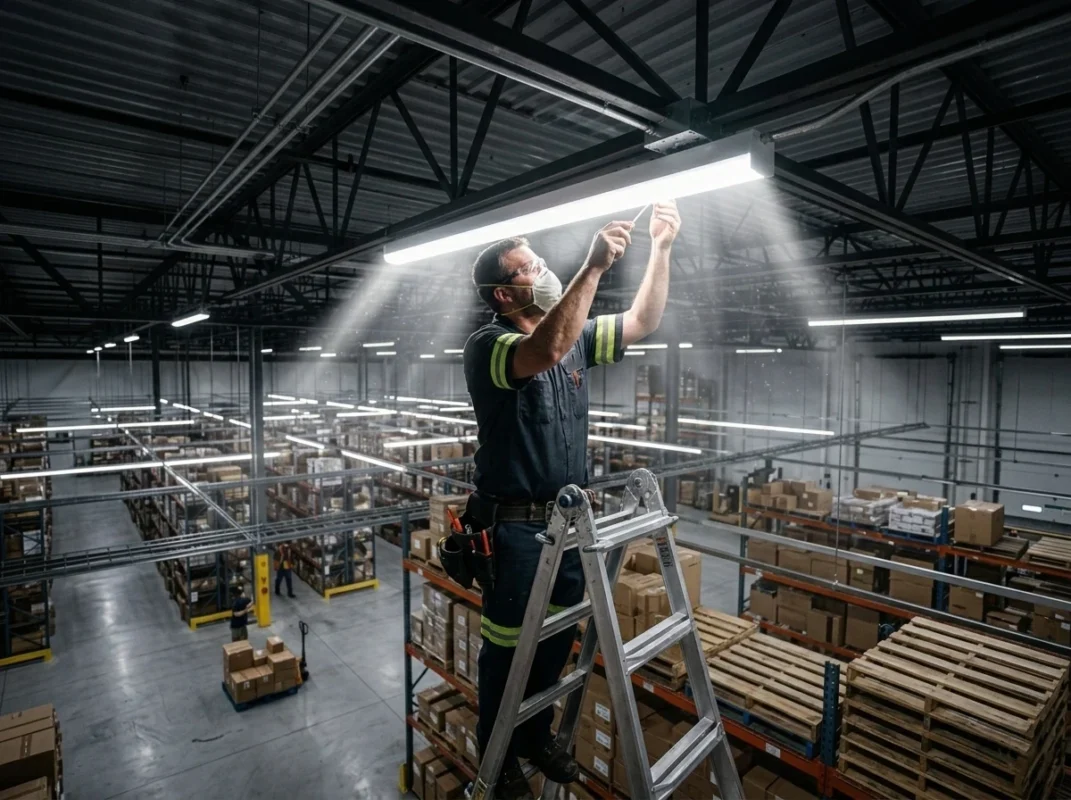
Warehouse: High lumen output, higher color temperature (5000K+), rugged thermal management
Office or Classroom: Neutral white (4000K), CRI 80+, even distribution for visual comfort
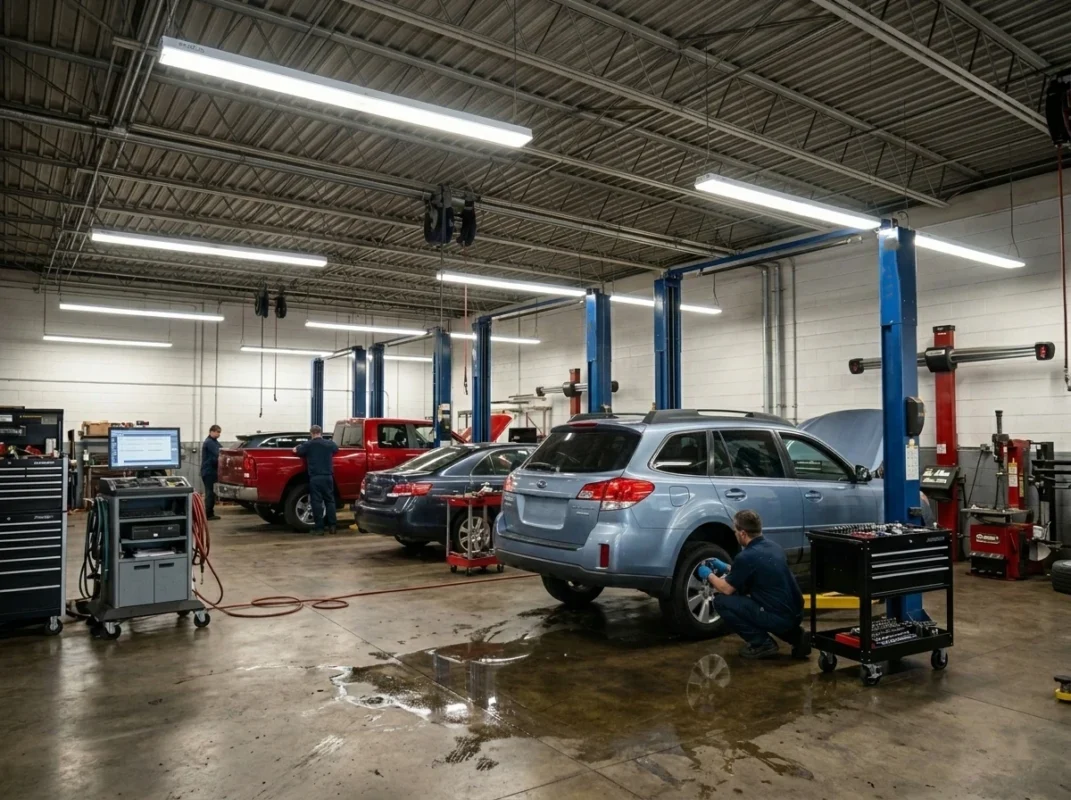
Garage or Workshop: Daylight-like brightness, durable construction, easy access tubes
Retail Space: Balanced light with high CRI to make products stand out
Each application benefits from a tailored approach — and the best 4 foot LED light fixture is the one that meets the specific performance needs of the space.
Expert Checklist Before You Buy
Before clicking “purchase,” make sure your chosen 4 foot LED light fixture ticks these boxes:
✔ Appropriate brightness (lumens)
✔ Efficient wattage for your usage patterns
✔ Correct color temperature for space function
✔ Adequate CRI for visual needs
✔ Safety and performance certifications
✔ Good thermal management
✔ Easy installation or retrofit compatibility
✔ Solid warranty support
✔ Reasonable long-term value
If it meets all these criteria, you’re not just buying a fixture — you’re investing in better lighting infrastructure.
Final Expert Takeaway
If your fluorescent fixtures are flickering, humming, or eating maintenance time, upgrading to a 4 foot LED light fixture isn’t just a modern upgrade — it’s a practical financial decision.
For small spaces, a tube retrofit works.
For long-term reliability, replacing with new 4 ft LED light fixtures often makes more sense.
If you’re serious about efficiency, now you know exactly how to convert 4ft fluorescent light to LED, how to change fluorescent to LED safely, and what mistakes to avoid.
Lighting isn’t just illumination.
It’s infrastructure.
And done right, a 4 foot LED light fixture pays you back every single month.
Frequently Asked Questions
Can I replace my 4FT fluorescent with LED?
Yes. In most cases, you can replace a 4-foot fluorescent tube with either compatible 4 foot LED bulbs or install a complete 4 foot LED light fixture.
You have two main options:
• Use ballast-compatible LED tubes (quick swap, no rewiring)
• Perform a ballast bypass and install direct-wire 4ft LED bulbs
• Replace the entire housing with a new 4 ft LED light fixture
If your ballast is older or already causing flicker, replacing the entire fixture or bypassing the ballast is typically the smarter long-term decision.
What are two disadvantages of LED lights?
While a 4 foot LED light fixture offers major benefits, there are two realistic drawbacks:
1. Higher upfront cost compared to fluorescent tubes.
2. Compatibility issues when retrofitting existing fluorescent fixtures improperly (especially if ballast types are mismatched).
That said, both issues are manageable with proper planning and correct installation.
How long do 4 foot LED lights last?
A quality 4 foot LED light fixture is typically rated between 50,000 and 100,000 hours under normal operating conditions.
For perspective:
• At 10 hours per day, that’s roughly 13–25 years of use.
• Unlike fluorescent tubes, LEDs gradually dim over time instead of burning out suddenly.
Actual lifespan depends on heat management, driver quality, and installation conditions.
Do I need to remove ballast for a LED tube?
It depends on the type of LED tube you’re installing.
• Ballast-compatible tubes: No removal required.
• Direct-wire (ballast bypass) tubes: Yes, the ballast must be removed or disconnected.
Many electricians recommend bypassing older ballasts when performing a 4 foot fluorescent light LED replacement to eliminate future failure points and maximize efficiency.
What happens if you put an LED bulb in a fluorescent fixture?
If the LED tube is compatible with the existing ballast, it should operate normally.
If it is not compatible:
• The light may flicker
• It may not turn on
• It may fail prematurely
Before installing 4ft LED bulbs, always verify whether they are designed for ballast use or direct-wire installation.
What happens if you put an LED bulb on a ballast?
If the LED tube is not rated for ballast operation and you leave the ballast connected:
• The tube may not function
• The internal driver can be damaged
• You may void the product warranty
This is why understanding how to convert 4ft fluorescent light to LED correctly is essential before installation.
How much does it cost to convert fluorescent to LED?
Costs vary depending on whether you install replacement tubes or a full 4 foot LED light fixture.
Typical ranges:
• 4 foot LED bulbs: $8–$25 per tube
• Complete 4 ft LED light fixtures: $40–$120 per unit
• Professional installation: $50–$100 per fixture (if required)
In most commercial settings, the payback period is 1–3 years due to energy savings and reduced maintenance.