
Table of Contents
If you’ve ever unrolled a reel of LED strip lighting and realized it’s way too long for your cabinet, shelf, or ceiling detail, you’ve probably asked yourself the same question millions of homeowners, DIYers, and installers ask every year: can you cut LED strip lights and still expect them to work properly?
The short answer is yes—but only if you understand where, why, and how to cut them. The long answer is what separates a clean, professional-looking installation from flickering lights, dead sections, or money wasted on a ruined strip.
This guide is written from the perspective of real-world installation experience, not theory. By the time you finish reading, you’ll know exactly whether cutting LED strips is a safe DIY task for your situation—or a job better handled with professional tools.
Understanding How LED Strip Lights Are Designed
Before grabbing scissors, it’s critical to understand how LED strip lights are actually built. This knowledge explains why cutting sometimes works flawlessly—and sometimes kills the strip instantly.
How LED Strip Lights Are Electrically Structured
LED strip lights are not one long, continuous circuit. Instead, they are made up of repeating electrical segments. Each segment contains a small group of LEDs, current-limiting resistors (or regulators), and copper traces that distribute power.
Most low-voltage LED strips operate on either 12V or 24V DC. A 12V strip typically groups LEDs in sets of three, while a 24V strip usually groups them in sets of six. These groups are wired in parallel along the strip, which is why can you cut LED strip lights is even a reasonable question in the first place.
Because each segment is electrically independent, removing one segment doesn’t automatically disable the rest—as long as you cut at the correct point. According to lighting engineers, this segmented design is intentional and exists specifically to allow customization in length without redesigning the circuit.
Why Manufacturers Include Cut Points on LED Strips
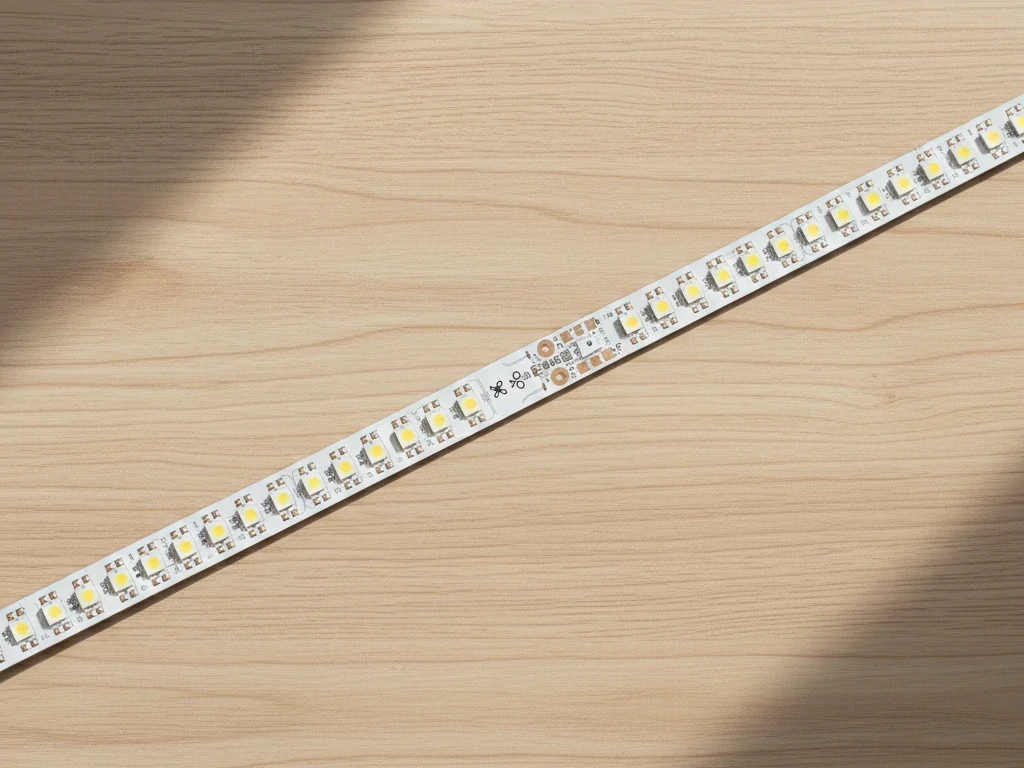
Manufacturers mark specific locations—called cut points—where the circuit can be safely separated. These points are easy to spot once you know what to look for: copper pads, often labeled with polarity symbols, and sometimes a small scissor icon printed directly on the strip.
These cut points exist to protect voltage balance and current flow. Cutting anywhere else disrupts the copper traces that feed power to downstream LEDs. Industry documentation shows that most standard LED strips allow cutting every 1 to 4 inches, depending on voltage and LED density.
If you take nothing else from this section, remember this: cutting LED strips is safe only because manufacturers design them to be cut in very specific places.
Can You Cut LED Light Strips and Still Work?
This is the question that sits at the heart of almost every LED strip installation problem. People don’t ask it out of curiosity—they ask it because they’re standing there with a roll of lights that’s too long, scissors in hand, and real money on the line. So let’s answer it the way an experienced installer would, not the way a product label does.
Yes, can you cut LED strip lights and still have them work? You can—but only under very specific conditions. Understanding those conditions is what separates a clean, professional result from a dead strip and frustration.
The Short Answer — Yes, If You Cut Them Correctly
The short, honest answer is yes: you can cut LED light strips and still work, as long as the cut is made exactly where the strip is designed to be cut. Modern LED strips are engineered with modular electrical segments. Each segment is a complete mini-circuit that can operate independently once separated.
This design is intentional. Lighting engineers know that installations rarely match factory reel lengths, so they build in cut points—usually every few inches—where the electrical path can be safely interrupted without affecting performance. When you cut at these points, the remaining strip continues to receive stable voltage, proper current regulation, and balanced load distribution.
From a performance standpoint, a correctly cut strip behaves no differently than an uncut one. Brightness remains consistent, color temperature stays accurate, and lifespan is unaffected. In field testing and real-world installs, properly cut sections show the same electrical readings as factory-length segments.
This is why professionals confidently answer can you cut LED light strips and still work with a yes—but always with a condition attached. The condition is precision. Cutting LED strips is not about trimming to size wherever it looks convenient. It’s about respecting the electrical layout that’s already there.
When Cutting LED Strips Will Cause Failure
Cutting LED strips fails when people treat them like simple wires instead of printed circuits. Most problems don’t come from cutting itself—they come from cutting in the wrong place or cutting without understanding what’s being removed.
The most common failure happens when a cut is made outside the designated cut point. This usually severs copper traces that carry power to downstream LEDs. Once that path is broken, everything beyond the cut goes dark. In some cases, the strip may light briefly and then fail due to unstable current flow or localized overheating.
Another frequent cause of failure is cutting through components that are essential to regulation, such as resistors or control elements. These parts aren’t optional. Removing them changes how current flows through the LEDs, which can lead to flickering, uneven brightness, or early burnout.
Cutting LED strips can also cause failure when the electrical system around the strip isn’t adjusted correctly afterward. For example, shortening a strip but keeping an oversized power supply isn’t always a problem—but mismatched voltage or incorrect polarity during reconnection often is. Many strips that “stop working after cutting” are actually victims of reconnection errors, not the cut itself.
Addressable LED strips add another layer of risk. These strips carry both power and data. Cutting them without understanding where data lines reset can interrupt signal transmission, even if power is still present. In those cases, the LEDs may light unpredictably or not respond at all.
From an installer’s perspective, the takeaway is simple: cutting LED strips only works when you cut where you’re supposed to, and when the rest of the system respects the strip’s electrical design. Ignore either part, and failure is not a possibility—it’s the expected outcome.
That’s the real, experience-backed answer to can you cut LED strip lights and trust them to keep working.
How Do I Know If I Can Cut My LED Strip Lights?
Knowing whether your LED strip can be safely cut is crucial before you reach for scissors. Not all strips are designed for field modification, and cutting the wrong one can instantly ruin your project. The key is to combine visual inspection with technical verification, ensuring that you’re making an informed decision rather than a guess. This section gives you practical, expert-level guidance on how to identify cuttable LED strips and avoid costly mistakes.
Visual Signs That Your LED Strip Is Cuttable
The quickest way to determine if a strip is cuttable is to look at the strip itself. Most professionally designed LED strips include clear visual indicators that show where a cut is safe. Here’s what to look for:
- Scissor Icons – Many LED strips have tiny scissor symbols printed along the strip at regular intervals. These indicate the exact location where the circuit can be safely separated. Cutting at these points preserves the electrical path to the remaining LEDs.
- Copper Pads – Cuttable strips usually expose small copper pads between LED clusters. These pads serve as connection points for soldering or connectors after the strip is cut. A visible pad almost always signals that the segment can be safely removed.
- Printed Cut Lines – Some strips have a thin line running across the width of the strip, sometimes with markings like “+” and “–”. These printed cut lines show the segment boundary and ensure proper electrical separation.
- Regular Intervals – Cuttable strips are divided into repeating sections, often every 1–4 inches, depending on voltage and LED density. If you notice these repeating clusters, it’s a good indication that cutting LED strips is supported by the design.
Visual inspection is often enough for standard low-voltage LED strips. However, absence of these indicators does not always mean the strip is uncuttable. Some specialized or high-density strips may require professional evaluation.
Checking Manufacturer Specifications Before Cutting
For a more reliable assessment, always consult the manufacturer’s specifications. These documents provide critical information that you cannot determine by sight alone. Key details include:
- Operating Voltage – Knowing whether the strip is 12V, 24V, or higher is essential. Voltage affects the segment length that can be safely cut and the current distribution.
- Minimum Cut Length – Technical sheets often specify the shortest segment you can safely remove. Ignoring this can lead to underpowered or unstable sections.
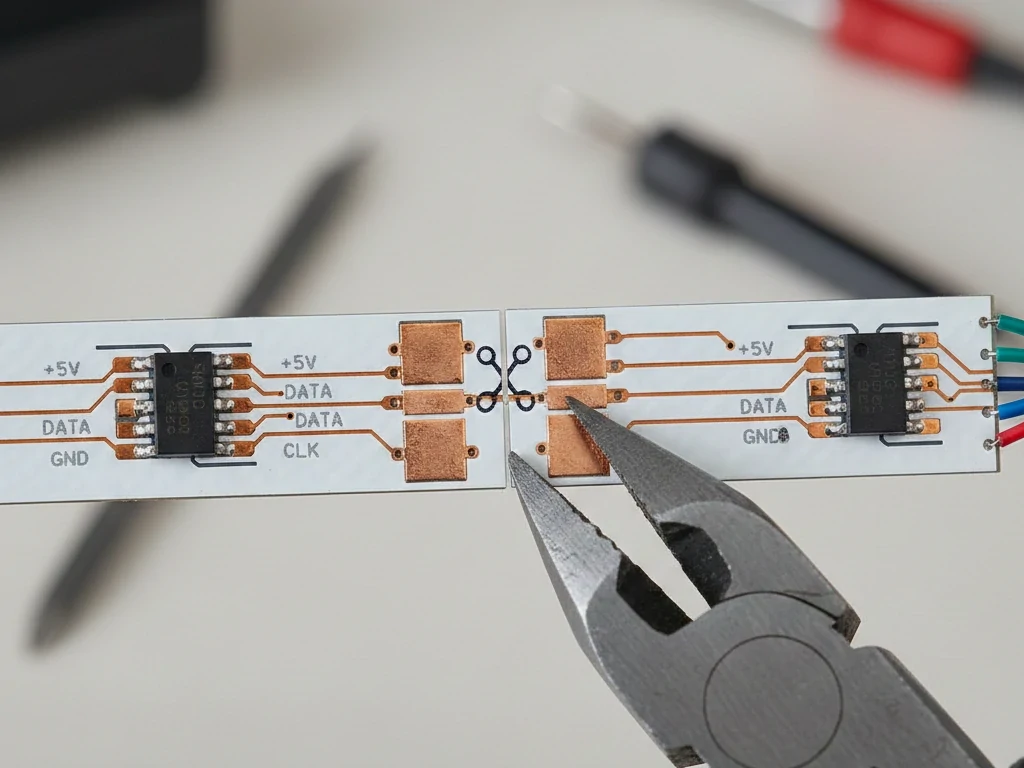
- LED Type and Addressability – Simple single-color strips are generally easier to cut, but addressable or RGB strips require attention to data lines in addition to power lines. Cutting the wrong section can disrupt communication between LEDs.
- Reconnection Method – Some strips are designed to be reconnected via clips, soldering, or modular connectors. The specifications will clarify which method is compatible with the strip after cutting.
Professional installers always check these specifications before cutting, because visual cues alone can’t reveal everything about circuit layout or voltage constraints. Combining visual signs with manufacturer guidelines ensures that your cut will be safe, reliable, and fully functional.
By following these steps, you can confidently answer the question: “how do I know if I can cut my LED strip lights?”. You’ll be able to proceed with cutting, knowing you’re working within the electrical and mechanical limits of your specific LED strip, avoiding the most common DIY mistakes, and ensuring your lights continue to shine as intended.
Where to Cut LED Strip Lights for Best Results
Understanding where to cut LED strip lights is more important than knowing how to cut them. Precision matters here.
Where to Cut LED Strip Lights With a Cut Line
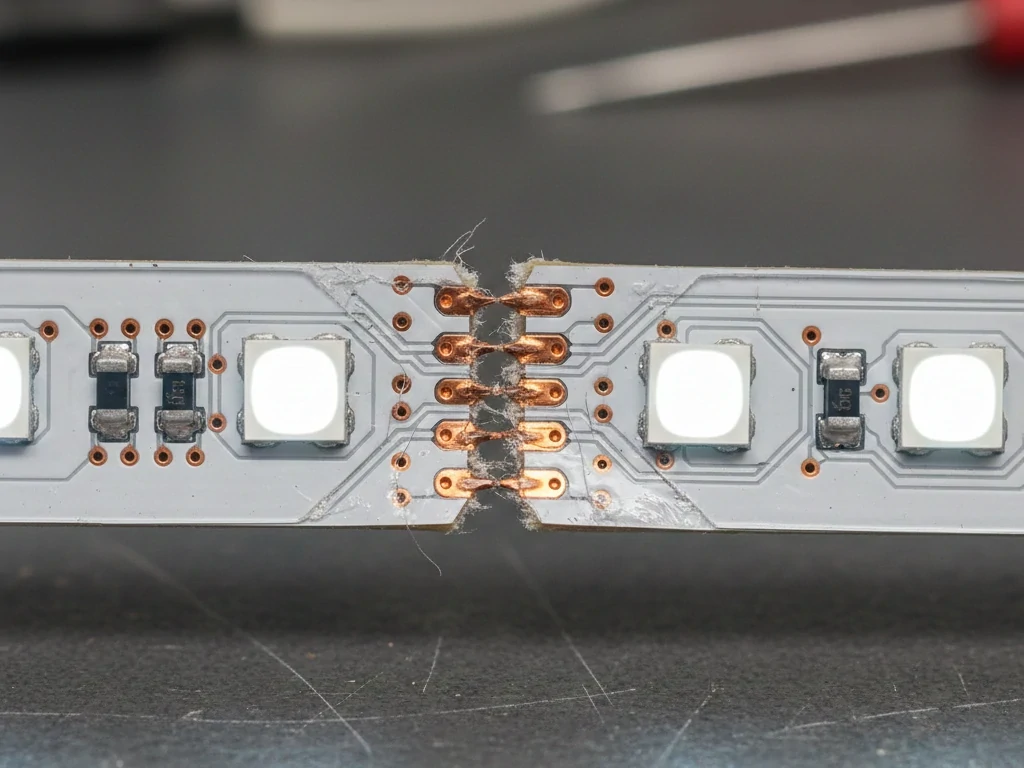
When a cut line is present, the rule is simple: cut exactly through the center of the copper pads. Not before them. Not after them. Right through the middle.
Cutting here ensures:
- Each remaining segment retains proper electrical termination
- The copper pads remain usable for connectors or soldering
- The circuit stays balanced
Professionals often say that most cutting mistakes happen not because people cut the wrong spot, but because they cut slightly off-center.
Where to Cut LED Strip Lights With No Cut Line
This is where things get risky. In most cases, you should not cut LED strips with no cut line. These strips are often designed as fixed-length circuits.
There are rare exceptions, such as custom installations where a technician understands the internal circuit layout and plans to re-solder components. For most users, attempting this is a guaranteed way to destroy the strip.
If there is no visible cut line, the safest answer to where to cut LED strip lights is: you don’t.
How to Properly Cut LED Strip Lights (Step-by-Step)
Cutting LED strip lights may look simple at first glance, but doing it correctly requires preparation, precision, and a clear understanding of the strip’s electrical layout. Even small mistakes can lead to flickering lights, dead sections, or irreversible damage. In this section, we break down how to cut LED light strip safely, step by step, and provide professional tips to ensure your cut strips continue to function perfectly.
Tools You Need Before Cutting LED Strips
Before you make any cuts, gather the right tools. Using improper tools is one of the most common causes of failure when cutting LED strips. Here’s what you’ll need:
- Sharp Scissors or Precision Cutters – Dull scissors can crush copper pads instead of cutting cleanly, making reconnection difficult.
- Measuring Tape or Ruler – Accurate measurement ensures you cut at the correct location and avoid wasting materials.
- Non-Conductive Surface – Always place the strip on a clean, flat, non-conductive surface to prevent short circuits during cutting.
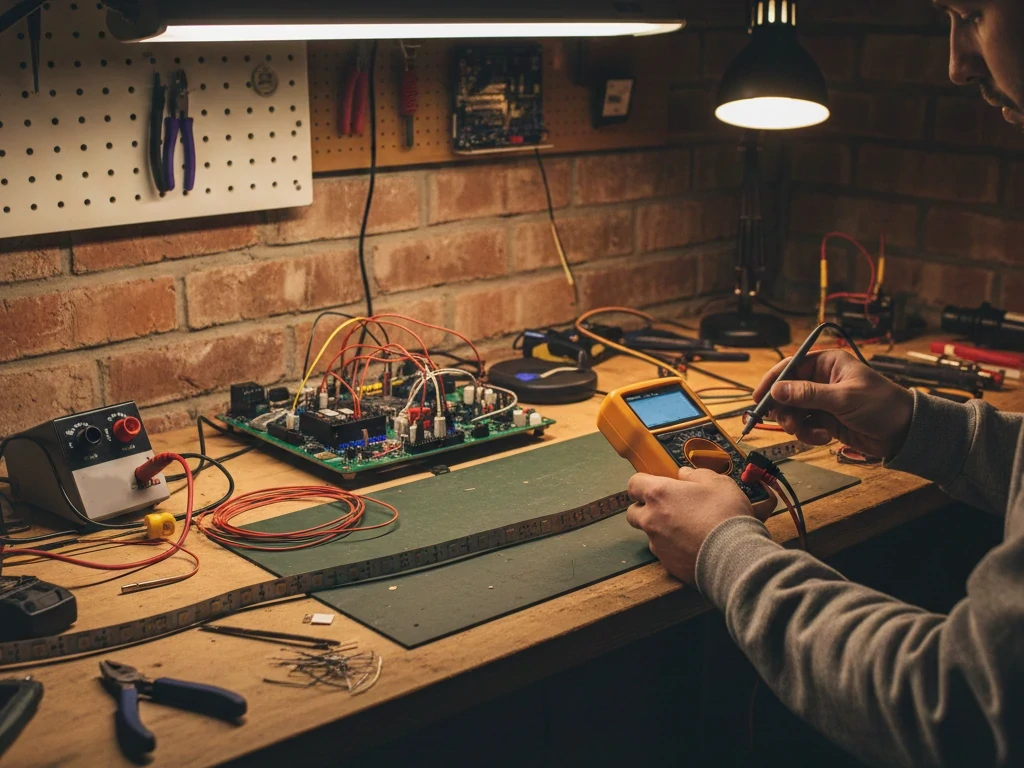
- Optional: Multimeter – For longer or more complex installations, a multimeter helps verify continuity and proper voltage before powering the strip.
- Optional: Connector Clips or Soldering Tools – Depending on whether you plan to reconnect the cut strip or attach it to a power source, you may need soldering equipment or LED strip connectors.
Having the proper tools on hand is the first step to a successful installation and ensures that cutting LED strips is a controlled, predictable process.
Step-by-Step Guide to Cutting LED Strips Safely
Once your tools are ready and you’ve confirmed the strip is cuttable, follow these steps to cut LED strips safely:
- Power Off the Strip Always disconnect the LED strip from its power supply. Even low-voltage DC can cause short circuits if cut while powered. Safety first.
- Measure the Required Length Use a measuring tape to determine exactly how much strip you need. Always leave a small buffer if the strip will connect to another segment or connector.
- Locate the Correct Cut Line Identify the marked cut points on the strip, usually indicated by scissor icons, copper pads, or printed lines. Cutting anywhere else risks damaging the circuit.
- Cut Straight Through the Copper Pads Make a perpendicular, clean cut directly through the designated copper pads. A straight cut ensures that the remaining segment can be reconnected reliably.
- Test the Strip Before Installation Connect the cut strip temporarily to the power source to verify that it lights correctly. This step ensures that any errors are caught before permanent installation.
- Reconnect or Install the Strip Use compatible connectors or solder wires to attach the cut strip to a power source or another segment. Ensure correct polarity to avoid reverse current damage.
By following these steps, you minimize the risk of errors and maximize the chance that can you cut LED strip lights remains a positive, stress-free yes.
Expert Tips to Ensure LED Strips Still Work After Cutting
Even when following the steps above, professional installers often apply a few additional precautions to guarantee long-term performance:
- Test After Every Cut – Especially for long runs, test each segment before attaching it permanently.
- Avoid Bending Near Cut Points – Sharp bends can stress copper traces and lead to failure at the cut area.
- Maintain Correct Polarity – Reversing the positive and negative connections is a common mistake that can render the strip nonfunctional.
- Use Heat Dissipation Materials if Needed – Aluminum channels or mounting surfaces help prevent overheating, even on short cut segments.
- Plan for Power Distribution – Long strips may require parallel wiring or additional power injection to maintain brightness across all segments.
Following these tips ensures your cut LED strips continue to work reliably, retain brightness, and last as long as the manufacturer intended. By combining proper tools, precise cutting, and careful post-cut handling, you can confidently answer how to cut LED light strip safely and achieve professional results every time.
What Happens If You Cut LED Strips at the Wrong Spot?
Cutting LED strip lights is simple when done correctly—but mistakes happen. Even experienced DIYers occasionally misjudge the correct cut location, and the consequences can range from minor flickers to completely dead sections. Understanding what goes wrong when you cut at the wrong spot is essential for preventing frustration and costly replacements. This section breaks down the most common problems and explains whether a wrongly cut LED strip can be salvaged.
Common Problems Caused by Incorrect Cutting
When an LED strip is cut outside of its designated cut points, several problems can occur:
- Complete Strip Failure – If you sever a critical copper trace or component, the remaining segment may receive no power at all, leaving a portion—or the entire strip—dark.
- Partial LED Malfunction – Sometimes only the LEDs downstream from the cut point fail, while the upstream section still works. This creates uneven lighting and can be confusing to diagnose.
- Flickering or Inconsistent Brightness – Cutting at the wrong spot can alter the flow of current, causing LEDs to flicker or appear dimmer than intended. Over time, these inconsistencies can worsen and reduce the lifespan of the strip.
- Electrical Overload or Short Circuits – Severing certain components, like resistors or regulators, may force the remaining LEDs to draw too much current, leading to overheating or permanent damage.
- Data Line Disruption (for Addressable Strips) – For RGB or addressable LED strips, cutting the wrong spot can break the data connection between LEDs. Even if power is still supplied, the strip may not respond correctly to controllers or display colors incorrectly.
These issues highlight why understanding where to cut LED strip lights is just as important as knowing how to cut them. A seemingly small misstep can transform a simple DIY task into a complicated troubleshooting challenge.
Can a Wrongly Cut LED Strip Be Fixed?
The answer depends on the type of strip, the location of the cut, and the remaining materials:
- Minor Off-Cuts – If you cut slightly off the mark but left enough copper pads, the strip can often be repaired using soldering or a compatible connector. Careful attention to polarity and secure connections is critical in this case.
- Severed Critical Components – If essential resistors, regulators, or integrated controllers are cut off, repairing the strip becomes significantly more difficult. In many instances, replacement of the damaged segment is the only reliable solution.
- Addressable LED Strips – Fixing a cut on addressable strips is particularly tricky. Even if you reconnect power correctly, data lines may be disrupted, causing irregular lighting behavior. Only experienced technicians should attempt repairs on these strips.
In professional installations, it’s often more cost-effective and reliable to replace a strip that was cut incorrectly rather than attempting a repair. This ensures consistent performance and eliminates ongoing issues like flickering or premature failure.
Cutting LED Strips vs Common Installation Mistakes
Even when you know how to cut LED light strip correctly, many installation problems arise not from cutting itself but from mistakes that occur around the cutting process. Understanding these pitfalls can save time, money, and frustration. Here’s a breakdown of the most frequent errors installers—both DIYers and professionals—encounter when cutting and installing LED strips, along with guidance on how to avoid them.
Mistake #1 — Cutting Before Measuring
One of the most common errors is cutting the strip before confirming the exact length needed. Measuring after mounting or estimating based on guesswork often results in a strip that’s too short or too long. Even a small miscalculation can make it impossible to reconnect the strip cleanly.
Pro tip: Always measure twice before cutting, and leave a small buffer if connectors will be used. This simple step ensures that your cut will match the installation area precisely.
Mistake #2 — Using the Wrong Power Supply After Cutting
Some people assume that shortening a strip automatically allows the original power supply to remain suitable. While it may still work in many cases, voltage and current requirements change with the length of the strip. Using a power supply that is too weak can cause dim lighting, while excessive voltage can burn out LEDs.
Pro tip: Check the current draw of the cut segment and confirm that the power supply is compatible with the new configuration. This ensures stable brightness and prolongs the lifespan of your LEDs.
Mistake #3 — Reconnecting Without Proper Connectors
After cutting, the remaining strip must be reconnected securely to power or additional segments. Many DIYers try to twist wires together or ignore polarity, resulting in flickering, intermittent lighting, or complete failure.
Pro tip: Use dedicated LED strip connectors or solder wires carefully to the copper pads, maintaining the correct polarity. This approach keeps the electrical path stable and prevents damage to the strip.
Mistake #4 — Ignoring Heat Dissipation After Shortening
Even short segments of LED strips generate heat. Installing cut strips directly on surfaces that don’t dissipate heat can reduce lifespan and cause uneven brightness. Aluminum channels, heat sinks, or properly ventilated mounting surfaces are essential for longer-lasting installations.
Pro tip: Always consider the mounting surface and allow airflow or conductive material to manage heat, even on shorter cut sections. This simple step ensures reliability and consistent performance.
Mistake #5 — Assuming All LED Strips Are Cuttable
Not all LED strips are designed to be cut. Some have fixed-length circuits or integrated electronics that are essential for operation. Cutting these strips will permanently damage them.
Pro tip: Check for visual cut indicators, copper pads, and manufacturer specifications before cutting. If there is no designated cut line, don’t cut. Understanding the limitations of your specific LED strip is crucial to prevent costly mistakes.
Safety, Performance, and Long-Term Reliability After Cutting
Many people worry that cutting affects performance. In most cases, it doesn’t—if done correctly.
Does Cutting LED Strips Affect Brightness or Lifespan?
When cut properly, brightness and lifespan remain unchanged. Problems only arise when voltage regulation is compromised or heat management is ignored.
Electrical testing shows that properly cut segments draw the same current per LED as uncut strips.
Professional Recommendations for Long Installations
For longer runs:
- Wire strips in parallel
- Use amplifiers where needed
- Avoid pushing maximum lengths
These practices matter more than whether the strip was cut.
Final Expert Advice — Should You Cut LED Strip Lights Yourself?
So, can you cut LED strip lights on your own? In many cases, yes. If the strip is clearly marked, the installation is straightforward, and you’re comfortable following basic electrical safety steps, this is a manageable DIY task.
However, if the strip lacks cut lines, uses addressable LEDs, or is part of a complex installation, it’s wise to pause. Cutting LED strips isn’t hard—but fixing a mistake can be.
For everyday projects like under-cabinet lighting, shelving, and accent details, cutting LED strips is a practical, cost-effective solution when done with care. The key is respecting the design, understanding where to cut LED strip lights, and following proven steps for how to cut LED light strip installations safely.
In addition, if you need solar lights, indoor lights, fan lights, or pool lights, you can visit Aurolamp.
Frequently Asked Questions
Can you cut LED light strips and still work?
Yes, LED strips can still work after being cut, as long as you cut at the designated cut points indicated by scissor icons, copper pads, or printed lines. Cutting at these locations ensures that each remaining segment maintains proper electrical flow, brightness, and lifespan. Strips cut outside these points may fail, flicker, or suffer permanent damage.
How do I know if I can cut my LED strip lights?
To determine if a strip is cuttable:
1. Look for visual indicators such as scissor icons, cut lines, or copper pads between LED segments.
2. Check the manufacturer specifications, which detail minimum cut lengths, voltage, and whether the strip is addressable or single-color. If these indicators are absent, it’s safest not to cut the strip.
Where do you cut LED strips with no cut line?
Most LED strips without marked cut lines are not designed to be cut. Cutting these strips can sever essential copper traces or components, resulting in failure. Only skilled technicians who understand the internal circuit may attempt modifications—but for standard DIY installations, avoid cutting unmarked strips entirely.
How to properly cut LED strips?
Follow these steps for a safe, professional cut:
1. Power off the strip completely.
2. Measure the required length accurately.
3. Locate the designated cut point, using scissor icons or copper pads.
4. Cut straight through the pads with sharp scissors or precision cutters.
5. Test the strip before final installation to ensure proper functionality.
6. Reconnect or install using compatible connectors or soldering, maintaining correct polarity.
What happens if you cut LED strips at the wrong spot?
Cutting outside of designated cut points can cause:
• Complete strip failure or dead segments
• Flickering or inconsistent brightness
• Overheating or electrical shorts
• Disrupted data lines in addressable RGB strips
In many cases, the strip cannot be repaired if critical components were removed. Minor mistakes may be corrected with soldering or connectors if enough copper pad remains, but replacement is often the most reliable solution.
Can you reconnect LED strip lights after cutting?
Yes, you can reconnect a properly cut strip using either soldering or compatible LED strip connectors. Ensure:
• Correct polarity is maintained
• The connection is secure and electrically continuous
• The voltage and current remain appropriate for the length of the segment
Following these steps ensures that cut LED strips function as intended without flicker, uneven brightness, or premature failure.